Making soap at home is a satisfying and rewarding experience, allowing you to take control of the ingredients in your skincare products. Whether you’re interested in a more natural approach or want to create personalized soap with unique scents, making soap at home can be both creative and eco-friendly. In this step-by-step guide, we’ll show you how to make soap at home, along with tips, essential ingredients, and the tools you need to get started.
Why Make Soap at Home?
Homemade soap offers several advantages over store-bought options. Here’s why you might want to try making your own soap:
- Control over Ingredients: Say goodbye to synthetic chemicals. When you make your own soap, you can use natural oils, plant-based ingredients, and essential oils, ensuring your soap is as pure as possible.
- Personalized Scents and Colors: With homemade soap, you can experiment with your favorite essential oils and natural colorants to create a soap that’s completely tailored to your preferences.
- Eco-Friendly: Making soap at home reduces waste and the need for excessive plastic packaging that often comes with commercial soap products.
- Cost-Effective: While the initial investment may seem high, making soap in bulk can save you money over time, especially if you use it frequently.
Pro Tip: Homemade soap also makes a fantastic DIY gift idea!

(Image Caption: A variety of beautifully handmade soaps with natural colors and floral decorations)
Ingredients You’ll Need to Make Soap
Making soap at home requires a few basic ingredients and tools. The most common method used for beginners is the cold process soap-making technique, which allows for more customization and control. Here’s what you’ll need:
Key Ingredients:
- Lye (Sodium Hydroxide): This caustic substance is essential for the saponification process (the chemical reaction between oils and lye that turns them into soap). Handle with care!
- Oils/Fats: Oils like olive oil, coconut oil, and shea butter are popular for making moisturizing soap. You can also mix different oils to achieve the desired texture and properties.
- Water: Used to dissolve the lye. Always use distilled water to prevent impurities.
- Essential Oils: For fragrance and skin benefits. Lavender, peppermint, and eucalyptus are all excellent choices.
- Colorants (Optional): Natural colorants like activated charcoal or turmeric can give your soap a pop of color.
Equipment:
- Mixing Bowl: Choose stainless steel or heat-resistant glass.
- Scale: Accurate measurements are crucial when making soap, so invest in a good kitchen scale.
- Stick Blender: To speed up the blending process and achieve the desired consistency.
- Thermometer: To monitor the temperatures of your oils and lye mixture.
- Soap Mold: Silicone molds work well for beginners.
- Safety Gear: Always wear gloves, goggles, and work in a well-ventilated space when handling lye.
Step-by-Step Guide to Making Soap at Home
Step 1: Prepare Your Work Area
Soap-making can get messy, so make sure your workspace is covered, and everything is within reach. Lye is a caustic substance, so ensure you’re wearing gloves and goggles for safety.
Step 2: Measure Your Ingredients
Precise measurements are essential when making soap. Use a kitchen scale to weigh each ingredient. For the right balance, you can use online soap calculators to determine the amount of lye and oils required.
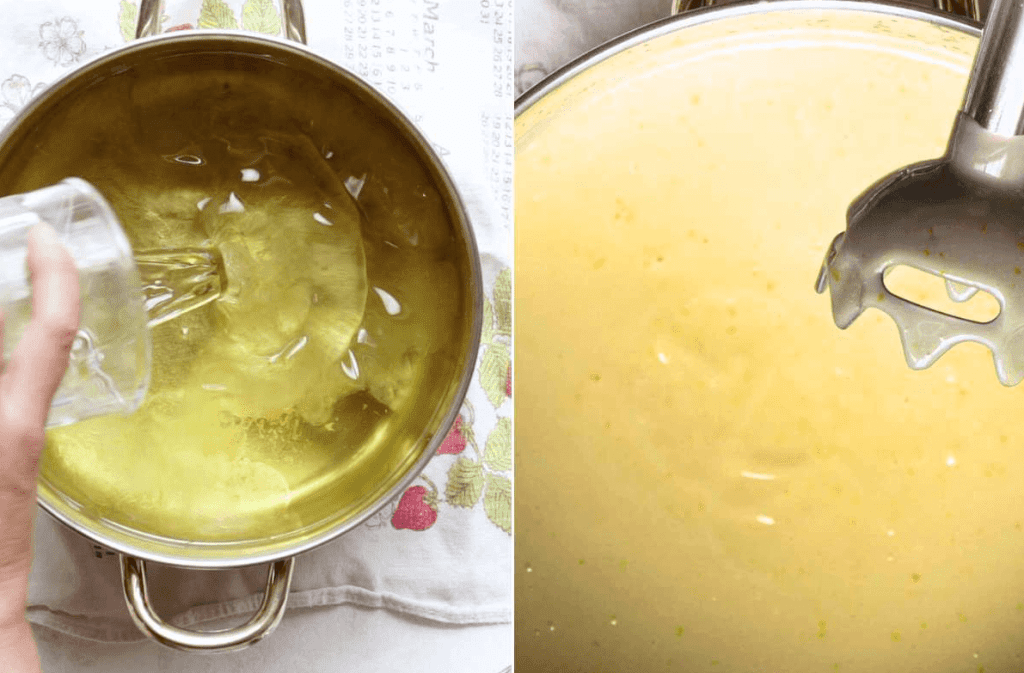
Step 3: Mix the Lye and Water
Important: Always add the lye to the water, never the other way around, as this could lead to dangerous reactions. Stir until the lye is fully dissolved. The solution will heat up quickly, so use caution and let it cool for about 10 minutes.

Step 4: Melt the Oils
While the lye is cooling, melt your solid oils (like coconut oil or shea butter). Liquid oils, such as olive oil, don’t require melting. Once the oils are combined, let them cool to around 100-120°F.
Step 5: Combine Lye and Oils
Once both the lye solution and oils are cooled to the same temperature (around 100-120°F), slowly pour the lye solution into the oils. Blend with a stick blender until the mixture reaches “trace”—when it thickens to a pudding-like consistency.
Step 6: Add Fragrance, Colorants, or Add-ins
At trace, you can add essential oils, colorants, and any exfoliants (such as oatmeal or dried flowers) to enhance your soap. Stir everything well to ensure it’s evenly distributed.
Step 7: Pour into Molds
Pour the soap batter into your chosen soap molds. Tap the molds gently to release any trapped air bubbles. Smooth the top with a spatula if desired.
Step 8: Let the Soap Set
Cover the mold with a towel to keep the soap warm and allow it to set for 24-48 hours. After this period, your soap should be firm enough to remove from the mold.
Step 9: Cut Your Soap
Use a sharp knife or soap cutter to cut the soap into bars. Be sure to make the bars evenly sized for consistent curing.
Step 10: Cure the Soap
Place your soap bars on a drying rack and allow them to cure for 4-6 weeks. This step helps the soap harden and ensures excess water evaporates. Proper curing results in longer-lasting, better-quality soap.
Tips for Perfect Soap Every Time
- Be Patient: Allow enough time for curing. Freshly made soap may feel solid, but it needs this time to become gentle and long-lasting.
- Use Quality Ingredients: High-quality oils like organic olive oil or coconut oil will make your soap much better in terms of texture and lather.
- Test the pH: After curing, test your soap’s pH with a strip. Ideal soap should have a pH between 8 and 10.
- Get Creative: Don’t be afraid to experiment with different scents, colors, and textures. The possibilities are endless!
Ready to Take Your Soap-Making Skills to the Next Level?
If you loved learning how to make soap at home and want more expert tips and recipes, check out our +260 Soap Recipes Guide. It’s packed with tried-and-tested recipes that will elevate your soap-making game, plus plenty of insider secrets to help you create beautiful, luxurious soaps every time.
Closing Thoughts
Making soap at home isn’t just a fun craft; it’s also a way to connect with what goes into the products you use daily. With the right tools, ingredients, and a little patience, you’ll be creating beautiful, custom soaps in no time. Whether for yourself, as gifts, or even as part of a business, homemade soap can be a rewarding venture.
Are you ready to get started? Remember, your soap-making journey is just beginning — and with our +260 Soap Recipes Guide, you’ll have all the knowledge you need to create your own signature soaps.
(Click the button to start making incredible soaps today!)
